December 2, 2011
Arrived Wednesday, Nov. 30 in the morning and got the compressor to blow water & diesel out the keel. Got out about a cup. Then I put in half a gallon of alcohol and blew it out, then did the same with a quart, and then again. It was coming out a light yellow at the end. Then I put the vacuum cleaner blowing into the keel for the rest of the day. Meanwhile I scrubbed the paint off the bottom of the keel only to discover another tiny rust spot. So I ground it away and got it ready to prime.
Thursday, Dec 1 This morning I primed and glassed the rust spot using the heat gun to get it to kick. I also filled some gouges in the keel with epoxy, but though I cleaned it thoroughly and sanded with 60 grit, I forgot to wet it out with thin epoxy and used the thickened epoxy directly on the keel, so I will see how that holds up. It is no big deal if it pops off because I have to fix gouges every time I haul it out. In the cockpit, I moved the aft hole for the cord that holds the backrests further aft so the backrest can slide aft of the awning pole. With some of the remaining epoxy I filled the holes that were no longer being used.
In the afternoon I borrowed some jerry cans and got 35 gallons of fuel. I set up the fuel transfer pump and pumped 32 gallons into the keel. Then I put all the fuel hoses in place and bolted the front plastic rail onto the keel. The rear rail didn't fit since I had to add epoxy to it's flange, and it was tight before. I also changed the contactor for the windlass and tested it. I put silicone sealant all around the gasket and dielectric grease on all the contacts.
Friday, Dec 2, I installed the speed seal impeller cover, and it went super easy, not a typical marine project. I also noticed wear on the original cover where the impeller rubbed against the cover.
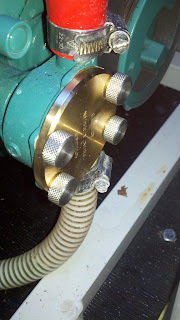 |
| The new easy to install SpeedSeal cover |
Then I got some antifreeze, borrowed a hose to keep the strainer filled as the engine pumped the water for cooling, and started the engine. After a few minutes I poured the antifreeze into the strainer and shut the engine off when it pumped out a gallon. While I was sponging out the spilled water I noticed a rusted broken hose clamp. It popped off the thru hull hose to the galley sink drain. This could have been a big problem except 1) I have two clamps on all the thru hull hoses 2) The hoses are really stuck on the fittings such that I have to cut them off, and 3) These hoses are all in a "sea chest" such that the water tight box they are in extends above the water line.
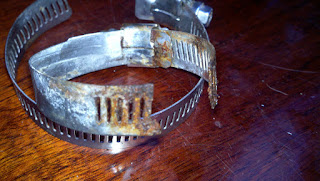 |
| The broken rusted hose clamp resting on its replacement |
Next I drained out all the water from the tanks and removed the hoses from the pumps and used the compressor to blow out the water lines.
Never remove the fittings on the pumps! It was a cinch blowing out the water. Where I had to remove the hose from a barb, I heated it with the heat gun and it was easy taking it off. When I tried to get the pump fitting back on it always cross threaded. The "way back" fitting would not go on correctly. I got frustrated and cut, so I decided to replace the dingy lift fitting. I got the ladder in position and then discovered that the same part number has a different diameter tube it attaches to, so it didn't fit. I attempted to bend it (pretty much knowing it wouldn't work) and I got it so I thought I could attach it. When I went to remove the old fitting I discovered it was through bolted, and with the mast up and all the stuff in it there was no way i could get to those nuts. I tied a safety line so if the fitting fails the line will catch it. Thoroughly annoyed at no getting the ring on, and it being near the time I should leave I went back to the hose to see if I could get it now. No luck, it only got worse. Finally I decided that I had to remove the pump so I could see what I was doing. I should have done that an hour ago. In a minute I got it on, and 15 minutes to get the pumps installed again. It would have been so easy if I had just taken the hose off the fitting before the pump instead of removing the pump fitting. When I finished that my neighbor, in a cat that he has been working on and living at Bock for over a year came over. We brainstormed the dingy lift ring and came up with the idea of wrapping a strap around the radar mast. I called the stainless fabricator he recommended, and the stainless guy brainstormed we me some more and we got it so simple I didn't need him any more, so I am going to wrap two straps that overlap at their ends around the mast, and fasten it with rivets so I don't have sharp screw ends projecting into the mast with the vent hose and radar cable. I was feeling pretty successful and saw that I really didn't have to be home until 7, rather than 5, so that gave me two more hours. I decided to tackle the front keel rail. I decided to see if the grinder would work to remove some material. That lousy cheep Chicago Tools grinder wouldn't start. I pulled off the end and discovered it was the linkage between the exterior switch and the real internal switch, so I use the grinder with the cover off so I could access the internal switch. That worked, and the grinder was just the right size. Pretty soon I had the slot wide enough to fit on the keel. The bolts gave me some trouble, but I sharpened one so it could align the parts and scrape the excess epoxy out of the holes, and I got all the bolts in and coated the ends with anti-seize before putting on the nuts. That was it, I was done. I loaded the dingy, the Honda generator, and all the regular stuff into the van, washed off the boat and got home right at 7, going directly to the party.

No comments:
Post a Comment